|
Navigation: Custom Forms Admin Menu > Customer Chat Forms Chat Settings |
Scroll Prev Top Next More |
The primary considerations when creating a customer chat form are the agents that will be interacting (topic Selection) and how your customers will find the chat form (target deployment). These are specified in the Topic Selection and Target Deployment parameters of your chat form. The chat settings page also provides access to reCAPTCHA settings, which are used to prevent automated submission of your chat forms.
Click the New Chat Configuration button to begin configuring your chat form. There are two types of chat forms, live chat and Chatbot. Chatbots use the iService Live Chat window and are styled using the same configuration as live chats. See the toggle below for Chatbot configuration details.
Live Chat
There are five values to set on the main live chat configuration page: Chat Name, Chat ID, Description, Topic Selection, and reCAPTCHA . Chatbots also required an OpenID Assistant ID.
a
These settings are explained in more detail below.
The Chat ID is used to identify the chat form and is part of the URL of the form. An example of a chat URL with a Chat ID of sales is shown below.
https://tenant.iservicecrm.com/s/sales/chat
Since the ID is part of the URL, special characters and spaces are not allowed in the ID. Use an ID that is short but descriptive such as sales or support. The IDs from all of your configurations, including workflow or other configuration settings, must be unique to your tenant. The settings page will display an error notifying you if the ID is already used or contains invalid characters. |
Every interaction within iService, including live chat, is associated with a topic. The chat topic determines the agents available to chat and should be chosen carefully to ensure you have agents available for the types of questions customers will ask. There are three options for setting the topic, each of which has its own configuration options.
Single TopicIf you only have one team of agents that support chat (e.g., Sales or Support), you can use a single topic configuration. This configuration allows the customer to skip the topic selection menu when they submit their chat request. Because the topic is already specified, you have the option to hide the chat button when there are no agents available for the specified topic. This configuration is appropriate when every agent that provides chat support has the skills for the topic chosen.
 A single topic chat configuration
Hide Chat When No Agents AvailableThe single topic setup allows you to hide the chat button from your website if there are no agents available to chat. For the chat button to appear or your website when this is on, you must have agents logged into iService that 1) have the chat.access access right, 2) are logged in and set as available to chat, and 3) have the segment access and skills for the chosen topic. When this conditions is not met, the chat button is hidden.
The hide chat button is only available when the single topic option is chosen, and is only relevant for WordPress or HTML deployments. The Standalone chat form is loaded independently and is not directly associated with a Chat with us button that can be automatically hidden.
Multiple TopicsThis option allow you to create a custom menu that includes custom names for the topics selected. After selecting a topic, provide the text to display in the topic selection menu. This is a common approach when your tenant has many topics, and only a small number of them are appropriate for customer chat. This allows you to offer a single Chat with us button, and customers can choose the appropriate team of agents based on the topic.
 Configuring multiple topics for chat
All TopicsThe All Topics option will display the standard topic menu to the customer, but will only display the public topics for segments configured in the Websites page. There are no additional options to set with this configuration other than choosing the All Topics radio button. This options is usually only appropriate if you have a small number of topics that have customer friendly names.
 The All Topics option |
You can deploy iService chat in many ways, but the most common are as a link on a web page or via a URL that you provide to your customer. The chat configuration tool provides a plug-in for WordPress sites, and a script file for other HTML websites. The standalone option provides a URL that you can email to a customer or open from a link on any web page.
WordPressWordPress is one of the most popular content management systems for building websites. iService chat can be added to a WordPress site with the iService Chat Plugin, which can be downloaded from the settings page as shown below.
After you create your configuration, the plug-in and URL to enter within your WordPress settings will appear as below.
 Deploying to WordPress
Click the Download plugin button to download the iService Chat Plug-in that you will install on your WordPress site. After you install the plug-in on WordPress, an iService Chat settings menu will appear in your WordPress admin page. Copy the URL provided (see image above) to the settings page as shown below.
 The WordPress Plug-in Settings Page
HTML WebsiteiService chat can be integrated into any HTML website, regardless of the content management system used. The HTML Website deployment option generates a <script> tag that you can copy into any page that requires iService chat. The most common method is to insert the script into a footer that is automatically included in the desired pages.
When you create the chat configuration with HTML Website as the target, the script will appear similar to the example below. When run on your web page, the script will create the iFrame that contains the chat button. The script includes the Chat ID, so you can install different chat forms on different pages of your website as needed.
 An HTML Chat Configuration
Stand Alone ChatThis option provides a URL that can be loaded directly by a browser. Use this option to create a link for email footers, to invite a customer to a chat, or to open your customer chat window as it's own page (rather than an iFrame within a website). You can use the same configuration but a different topic by changing the topicID to any topic in your tenant.
 Configuring a Standalone Chat Form
You can use custom iService form code to manage the display of buttons that open standalone chat forms. The $if -chat variable is used to determine agent availability and can be used to make custom deployments. See The $if -chat chapter for more details. |
iService includes built-in support for reCAPTCHA v2 (invisible and checkbox). The reCAPTCHA is enabled by default, but can be disabled if needed. Users will not see the reCAPTCHA challenge on their screen unless they are determined to be suspicious.
You can learn more about reCAPTCHA at https://developers.google.com/recaptcha/intro
 The reCAPTCHA Setting
On-premises Users Only: If you operate your own iService installation, you must add your site and secret keys to your master database to enable reCAPTCHA.
You can create reCAPTCHA keys at https://www.google.com/recaptcha/admin. Create a v2 Invisible key and then add the secret and site keys to your master database as shown below.
 Adding site and secret keys to the master DB settings table
|
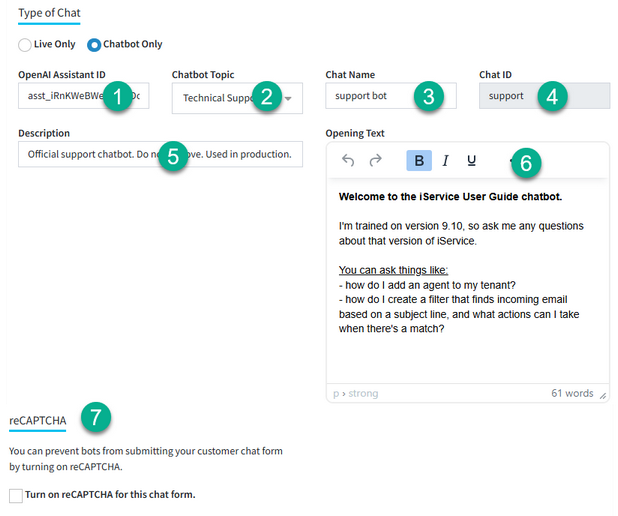
iService includes an integration to the OpenAI Assistant v2 API. To add a chatbot, create an Assistant in the OpenAI Playground using the tuning options and desired model. The only value you need to create your chat bot is the ID of the Assistant you create. iService uses the Assistant v2 API in chat forms. The styling of Chatbot forms is identical to the live chat forms.
The chat functions autonomously with runtime parameters that help ensure accurate results. Chatbot interactions can be monitored like live chats, and proactively converted to live chats by agents. All chatBot interactions are saved as contact history.
To create a chatbot, select Chatbot Only and enter the values described below.
The agent name displayed within the chat session will be the name of your OpenAI Assistant. Make sure your Assistant name is logical and customer friendly.
Creating an OpenAI AssistantOpenAI provides a robust environment for building and testing chatbots in the form of Assistants. Assistants can be trained on appropriate content and tested using the OpenAI Playground before you deploy it within iService. Creating your Assistant requires an OpenID account and a few steps explained below.
Step 1: Sign Up and Obtain API Key and Update iService External APIs1.Sign Up: Visit OpenAI's website and sign up for an account. 2.API Key: After signing up, navigate to the API section in your account dashboard to obtain your API key. Make sure the project key is created in the same project as your Assistant. 3.Paste your API key into the OpenAI section of the External APIs page in iService. Step 2: Access the OpenAI Assistant page and Create Assistant1.Navigate to Assistant Page: Go to https://platform.openai.com/assistants/ 2.Log In: Use your OpenAI credentials to log in. 3.Create an Assistant: Click the +Create button.
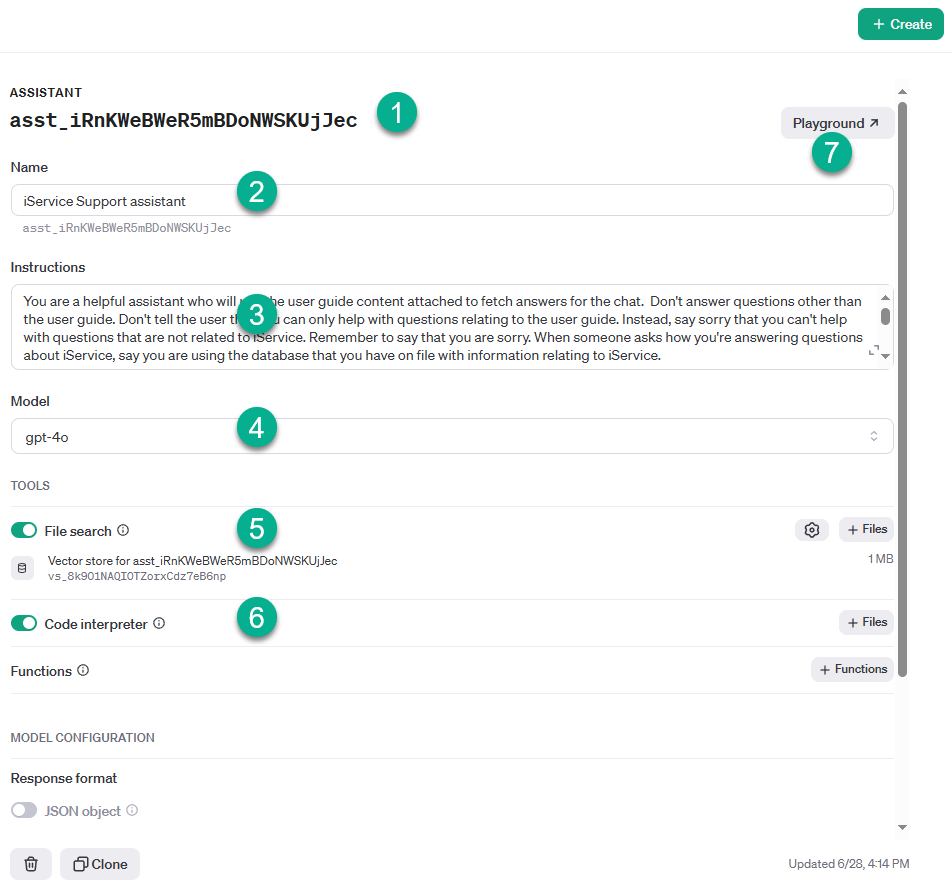
Step 3: Configure the Assistant and Add to iServiceCreate your assistant by completing the sections shown below. Test it using the playground button, and then paste the Assistant ID into the iService chat form setup page.
 Creating an OpenAI Assistant
|
© 2008 - 2025 One-to-One Service.com, Inc. All rights reserved.


