|
Navigation: Tools Menu > Mass Mailing Mailing Lists |
Scroll Prev Top Next More |
|
The Mailing List details tab provides a description of the list, indicates whether it is viewable by the contact, and specifies the segments in which it can be used. A description of the screen is shown below.
1.All lists are displayed at the top of the screen, similar to other admin tabs. The Segment column indicates the segments for which the list is available, and the public column indicates whether the list is publicly available to contacts in their My Account > Subscriptions page. 2.These buttons are used to create a new list or delete an existing list. 3.The name of the list is used for display on all internal and external pages. Since your customers may see this name, it’s important to use a name that is descriptive and appropriate for public viewing. 4.The description is displayed within the My Account >Subscriptions page and optionally on custom subscription management pages. We recommend that the description be short enough to accommodate use on customized list management pages. 5.Selecting the “Shown in My Account” box will make the list viewable by contacts in the customer portal. The list will appear as an available list to all contacts on the selected segments within their My Account > Subscriptions page. As shown below, the only Mailing List that is displayed is Press Releases, because the other list (Coupons and Promotions) is not public.
6.The Segments box indicates the segments in which the list will appear. It will also limit access to iService administrators that have corresponding segment access. For instance, if the List is marked as Segment 1 only, then contacts that only do business with Segment 2 will NOT see it in their My Account page.
|
Once you create your list, you need to add contacts that will receive mailings. Contacts can be added by an iService agent, or contacts can add themselves from a list management page such as My Account > Subscriptions (above). The details of all subscribers that have joined the list are displayed on the Mailing Lists > Subscribers page.
An example of the Subscribers page is shown below. This page shows that there are five contacts subscribed to the list, and the details of those members are displayed. This display will only show the first 1000 contacts for performance purposes. Clicking on a contact name will open the corresponding Customer Info > Contacts page with the Subscriptions tab highlighted.
Agent Options for Adding Subscribers
Agents can add subscribers in several ways: from the Maling Lists page, using the contact import process, or from the Customer Info > Contacts > Subscriptions page.
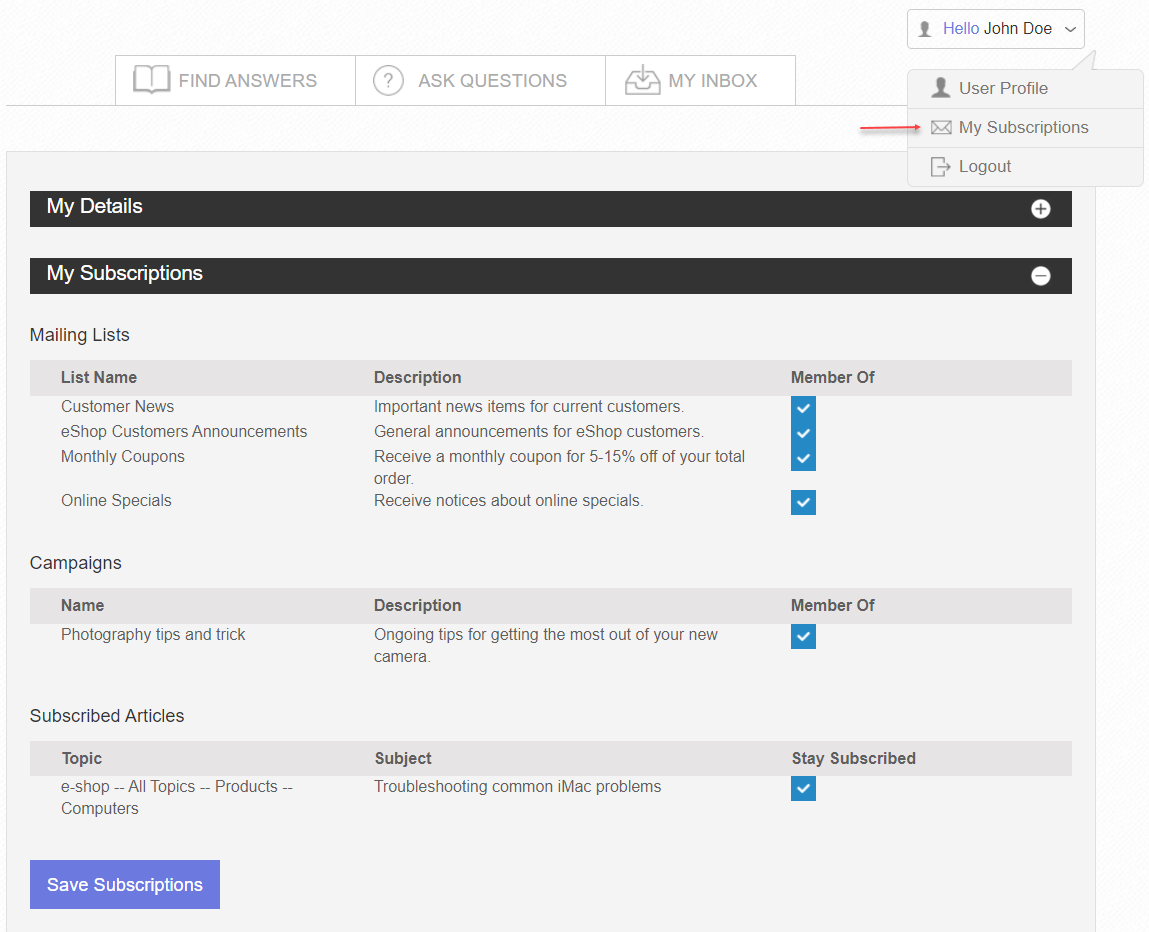
Contact Options for Subscribing ThemselvesContacts can manage their subscriptions from the Customer Portal. They can subscribe to three types of lists: standard mailing lists, campaigns, and Find Answers article subscriptions. A summary of all of these subscriptions is shown in the contact’s My Subscriptions screen below.
Making a basic registration pageWith iService forms you can create custom pages for customers to subscribe to your mailing lists and campaigns. If you have multiple lists or use the iService knowledge base, you can also create an email preferences page where the user can manage all of their subscriptions.
We suggest you speak with your iService account manager for help designing and constructing custom email preference pages. |
When a contact does not want to receive further mailings from a list, you are obligated by law to honor that request (except for certain types of account correspondence that are transactional rather than marketing related). These contacts are referred to as Opted Out and are shown within the Mailing Lists > Unsubscribes page.
There are several ways that a contact may be opted out of a list. a.Unsubscribe via link in email – Your message may contain an Unsubscribe link to automate the contacts unsubscribe request. The recipient will click this link, which will load a URL that specifies the Contact ID, MSG ID, and List ID. This page will then set the Opted Out value to True for the contact, and a record of when the property was updated will be recorded in the contact property history. The page will refresh to either a standard iService Successful Unsubscribe page or a customizable message specified in the message. For additional information on the unsubscribe link, see the Link Variables section. b.Customer Portal > My Account > Subscriptions page - A contact can remove themselves in the same way that they add themselves to a list. c.Customer Info > Contacts >Subscriptions - Agents can remove subscriptions from the contact page, and can add those contacts to the Opt Out list.
|
© 2008 - 2025 One-to-One Service.com, Inc. All rights reserved.


